If you would like to build a Neewer RGB660 WIFI module yourself, you can find the complete instructions here.
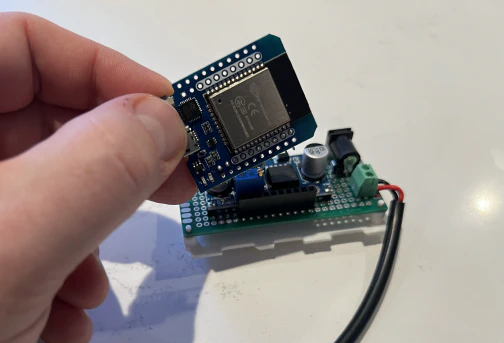
If you have purchased a pre-built Neewer RGB660 WIFI module, the only assmbly you will need to do is to insert the ESP32 module into the module board. It should only really fit in one direction.
Flash firmware
Skip if purchased pre-built
If you have purchased a pre-built Neewer RGB660 WIFI module from me, then it came with the firmware pre-installed. This means that you can skip the "Flash firmware" step and go straight to setup WIFI.
To make any use of your Neewer RGB660 WIFI module, you will have to install some microcontroller firmware to it. You can either install the binary version or if you have access to a ESPHome instance, you can also install the firmware from source (and possibly modify it if you so desire).
Flash firmware from binary
Installing the firmware from a precompiled binary is the easier and recommended way.
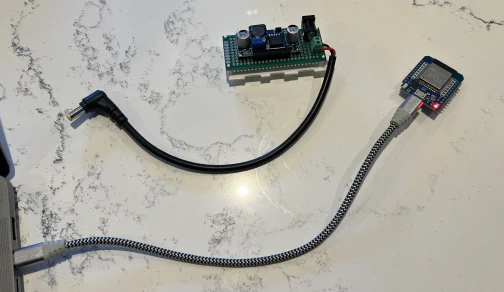
Connect the ESP32 module to your computer via the built-in USB port and click
the Connect button.
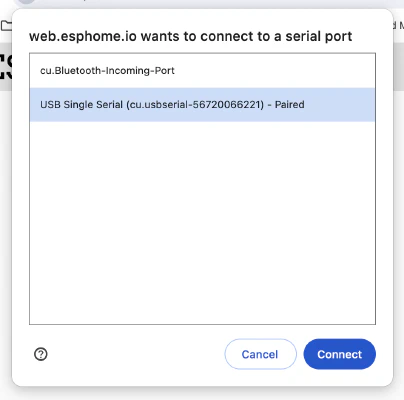
Select the serial USB port and confirm the connection
Click "Install Neewer Controller".
Can't connect via serial
Some ESP32 modules require you to push a tiny button on the
module before being able to connect via serial. It's usually on the side of the
module. Click it during step 1 between connecting the module to your computer
and clicking the connect button if you are having trouble connecting to your
module via USB.
.
Wait until the firmware completes installing and then setup WIFI via USB.
The second step (or first step, when setting up a purchased Neewer RGB660 WIFI
module) is to configure WIFI.
There are two ways to do this: via USB or via WIFI captive portal, I generally recommend configuring WIFI via USB if you have the option to. If you don't have a matching USB cable or no PC or Mac available, configuring WIFI via the WIFI captive portal will work just as well.
Setup WIFI via USB
Connect the ESP32 module to your computer via the built-in USB port and click the Connect button. If you have a pre-built WIFI module, you can first unplug the ESP32 module from the board to make handling easier.
Select the serial USB port and confirm the connection
Click "Connect to WIFI"
Select your WIFI network, enter the WIFI password and click "Connect"
Can't connect via serial
Like during the Flash firmware step, you may need to push a little
button on your ESP32 module to enable the serial connection. Do this in between
connecting the module to your computer and clicking the Connect button if you
are having problems connecting to your ESP32 module via USB.
Prompted to install firmware
Sometimes the pre-installed firmware for configuring WiFi is not detected correctly
the first time you connect. You will see a prompt to install the firmware
instead in that case. Simply close the dialog and click the Connect button again.
You should now get prompted to configure your WiFi.
Your Neewer RGB660 WIFI module will now connect to WIFI. Hit the "Visit device" link to verify it connected and for pairing your lights.
Setup WIFI via captive portal
If your WIFI isn't configured yet or if the Neewer RGB660 WIFI module fails to connect to WIFI at a later point, the WIFI module will spin up a WIFI hotspot that you can use to reconnect it to WIFI. This will allow you to configure WIFI even when you don't have a USB capable device available (like just your phone)..
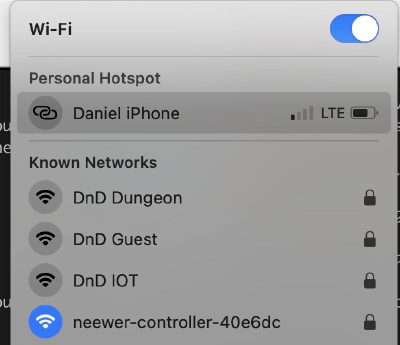
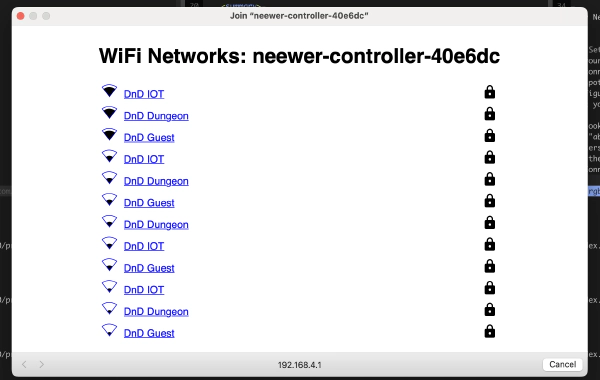
Look for a WIFI network with the name "neewer-controller-abc123" where the "abc123" part is a 6 character combination of any of the digits 0-9 and letters a-f (a so called MAC address). You may have to wait a minute or two for the WIFI network to show up.
Note down the name of the WIFI network. It is also the name of your WIFI module. We will need it later to verify the connection.
Connect to the WIFI network using the password "neewer-wifi-controller"
Once you have connected to the WIFI hotspot, the captive portal UI should
show up. If not, you can also navigate to the address http://192.168.4.1 in your browser.
Select the WIFI you would like to connect to from the list of WIFI networks, enter the password and hit "Save".
Your Neewer RGB660 WIFI module will now connect to WIFI. Visit
http://<name-of-your-neewer-wifi-module>.local to verify it is connected and for pairing your lights.
Pairing with your lights
Next you will want to pair your Neewer RGB660 WIFI module with your lights.
You can repeat these steps to pair your WIFI module with a different light, too. Note that connecting to a different WIFI network does not erase the pairing information. This makes it easy to move your lights between WIFI networks.
Pairing your lights later
You can also pair your lights to the Neewer RGB660 WIFI module after you have added it to the control platform of your choice (like Home Assistant or Bitfocus Companion) using the interface those platforms provide.
Slot your Neewer RGB660 WIFI module into the back of your Neewer lights. If you have previously removed the ESP32 module, make sure to first place it back into your Neewer RGB660 WIFI module.
Plug in your lights DC power barrel plug into the WIFI module and the barrel plug coming from the WIFI module into the lights.
Turn on your Neewer RGB660 lights. Verify that your WIFI module and lights power on.
Visit your Neewer RGB660 WIFI module in the browser, like you did previously (see step Setup WIFI).
Click the little circular button in the Actions column next to the "Pair with closest light" label.
Your Neewer RGB660 WIFI module should now pair with the light it is mounted to. Verify that the value in the State column next to the Paired and Connected labels show "ON".
Add to Home Assistant
Once your Neewer RGB660 WIFI module is connected to WIFI and paired, it is trivial to add it to Home Assistant.
Follow this link to add a ESPHome configuration to your Home Assistance instance:
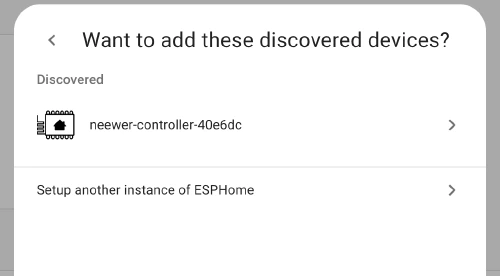
If you do not have my Home Assistant setup or do not want to use it, navigate to the Integrations dashboard of your instance.
Your Neewer RGB660 WIFI module should have been auto-discovered. Click on the card with the name of your Neewer RGB660 WIFI module (e.g. "neewer-controller-40e6dc").
If your WIFI module was not auto-discovered, instead select the "Setup another instance of ESPHome" card and fill use "<name-of-your-neewer-wifi-module>.local" as your host name. Leave the port unchanged.
Click submit.
Your Neewer RGB660 WIFI module was added to your Home Assistant instance! If you haven't previously paired your Neewer RGB660 WIFI module, you can now navigate to the device in your Home Assistant instance and click the "Pair with closest device" button from there.
Add to Bitfocus Companion
If you have already added your Neewer RGB660 WIFI module to Home Assistant, then you can easily add it to Bitfocus Companion via Home Assistant. This is the preferred way. However, if you are not using Home Assistant, follow the instructions to add it via HTTP API instead.
Add to Bitfocus Companion via Home Assistant
To add your Neewer RGB660 WIFI module to Bitfocus Companion, simply add the Home Assistant connection to your Bitfocus Companion instance and then assign the "HASS" actions (e.g. HASS: Set light on/off state) to control your Neewer RGB660 WIFI module lights.
On, off and brightness
You can use the following actions to turn the lights on or off and adjust the brightness:
HASS: Set light on/off state
HASS: Set light brightness (percentge)
HASS: Adjust brightness (percentge)
The UI for them is pretty much self-explanatory.
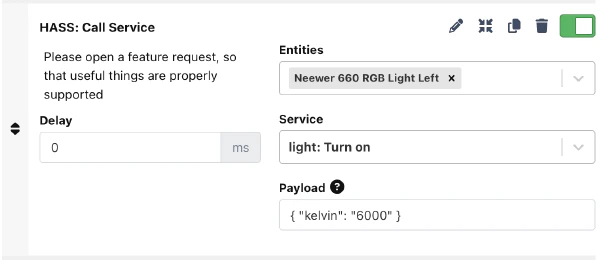
Color and color temperature
To control the color temperature and color of your lights, you can ue the HASS: Call service action. Simply choose your Neewer RGB660 WIFI module device as an entity and choose the "light: Turn on" service. In the payload section you choose the color temperature or color to set.
For example, to set a warm 3000K set the payload to the following:
1{"kelvin":"3000"}
Or to set a deep purple set the payload to the following:
1{"rgb_color":[153,0,153]}
Note that the values in the brackets are Red Green and Blue values between 0 and 255 respectively.
Add to Bitfocus Companion via HTTP API
The Neewer RGB660 WIFI module exposts a HTTP REST API to control any of it's functions, including controlling the paired lights.
Bitfocus Companion can use this API to talk to the Neewer RGB660 WIFI module
directly. Setting this up requires a little bit of elbow grease, but allows you to control your Neewer RGB660 lights without any additional dependencies on other systems (like Home Assistant).
Toggle, turn on, turn off
To add a simple toggle button
Add a new button to your Bitfocus Companion surface
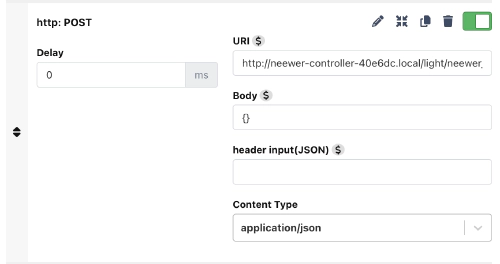
Add a http: POST action
Set
http://<name-of-your-neewer-wifi-module>.local/light/neewer_660_rgb_light/toggle as the URI. Make sure to replace <name-of-your-neewer-wifi-module> with the name of your Neewer WIFI module from before (see Setup WIFI).
Leave all other options unchanged. Click the "> Test" button at the top to test your new action. If you have done everything correctly your light should toggle on and off.
You can choose between three different actions to control your lights: toggle, turn_on and turn_off
Simply replace the last part of the URI with the corresponding action. For
example, to turn the light off instead of toggling it change the URI to http://<name-of-your-neewer-wifi-module>.local/light/neewer_660_rgb_light/turn_off
Brightness, color and color temperature
The turn_on action is special in that you can provide it with additional
parameters on how to turn on the light. Changing brightness or setting color or color tempeature can be done with those parameters.
You provide parameters as what are called query parameters. To do so, add a
list of parameter=value tuples joined by an ampersand & after a
questionmark ? to the URI. Sounds confusing? Here are a few examples:
Note that the color temperature is provided in Mireds, not Kelvin. You can
convert Kelvin values to Mireds by dividing 1,000,000 by the Kelvin value. E.g. to calculate the Mireds value for 3000K you simply do 1,000,000 / 3000 = 333.
Note that color values are provided as red r, green g and blue b with a range between 0 and 255.
You can also set color or color temperature together with brightness in the same call by adding the brightness parameter with an additional ampersand &
You can control other functions of the Neewer RGB660 WIFI module, too using the HTTP REST API. For example you could assign a button on your Bitfocus Companion surface to "Pair to closest light". To do so, create a http: POST action and set the following URI:
You probably won't need most other functions, but if you are curious, you can checkout the full documentation of the ESPHome web_server API and dig around the device web interface at http://<name-of-your-neewer-wifi-module>.local to see what else you might be able to cobble together.